Even though I don’t work in a museum, sending and receiving pinned insects is a routine activity for me. As a collector of beetles with some expertise in their identification, I’ve had opportunity to exchange with or provide IDs to other collectors from around the world. Of course, the extreme fragility of dried, pinned insect specimens makes them vulnerable to damage during shipment, especially when shipped overseas. While properly labeled, pinned insect specimens have no monetary value, the scientific information they represent is priceless, and every attempt should be made to protect them from damage during shipment. Sadly, despite our best efforts damage is sometimes unavoidable, as even packages marked “Fragile” can be subject to rough or careless handling. More often than not, however, I have received shipments in which the contents suffered damage that could have been avoided had the sender paid more attention to packing the shipment in a manner that gave it the best possible chance of arriving safely. Here I offer some general tips on the best way to pack and ship pinned insect specimens for shipment. While these remarks are broadly applicable to pinned insects in general, they are given from the perspective of a someone who collects beetles—specimens of which are relatively small to moderate in size, hard-bodied, and compact in form. Insects from other groups, especially those with large, fragile species such as Lepidoptera and Orthoptera, may require additional precautions to minimize the risk of damage.
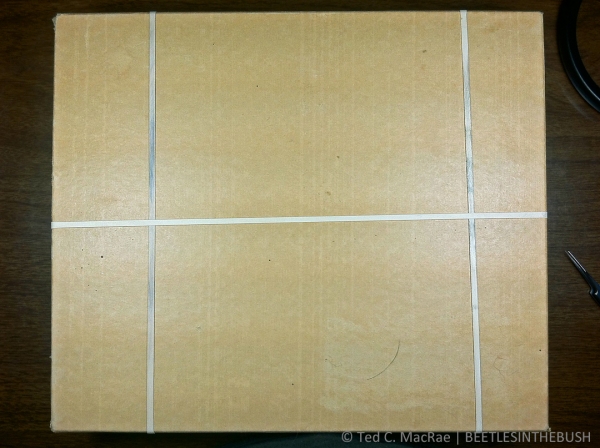
- Select a sturdy specimen box with a firm pinning bottom. The size of the box should be selected appropriate for the number of specimens—i.e., do not select a large box for only a few specimens or tightly pack too many specimens in too small a box, Modern polyethylene foams used in pinning trays seem sufficiently firm to hold pinned specimens during shipment as long as they are at least ¼” thick—thicker foams, of course, will hold even more firmly but often “push” the labels on the pinned specimens up against each other, necessitating additional labor to reset them. The box should have a tight-fitting lid that can be set firmly in place. Pin the specimens into the box, making sure the pins are set completely through the foam and taking care not to overpack the specimens within the box too tightly (body parts, especially antennae and tarsi, should never overlap) that could result in damage to them or adjacent specimens during removal. Ideally the specimens should fill the box completely, but if they do not then fill the empty space with blank pins to avoid large, blank areas of foam bottom without pins. Here is an example of a filled specimen box:

Pinned insects in specimen box ready for packing.
- Use brace pins for large or heavy specimens. This is one of the most common mistakes I see! In the example above, several of the larger species are surrounded by brace pins to keep them from rotating on their pins and damaging neighboring specimens. At least two pins should be used—I place them against the elytra on each side behind the hind legs, and very long or heavy specimens should be further braced by additional pins on each side of the thorax to further ensure they are fully immobilized. Although not shown in this example, specimens with very heavy heads (large mandibles, etc.) should be even further immobilized with additional pins at the head. Here is a closeup view of some of the specimens in the above box that have been further secured with brace pins:

Large specimens are further immobilized with brace pins.
- Use an inner lid with padding to hold it firmly against the specimens. An inner lid lies on top of the specimens underneath the specimen box lid to keep the specimens securely seated in the foam and prevent them from “working” their way out. Some specimen boxes designed for shipping, such as the examples shown in these photos, come with an inner lid that is hinged on a long side. If the specimen box lacks an inner lid, one should be fashioned from cardboard or heavy card stock. The advantage of an attached inner lid is that it will not move inside the box, so if an inner lid must be fashioned it is essential to trim it so that it fits precisely within the box to minimize the potential for movement. I like to draw an outline on the cardboard with the specimen box and cut on the lines, then shave off extra material from each side to shape it to the inside perimeter of the box. Either way, make a “pull tab” out of adhesive tape and attach it to the inner lid to allow easy removal during unpacking. If the inner lid when set in place does not seat firmly against the outer lid, extra padding material such as paper towels should be placed on top of the inner lid to ensure that it sits firmly against the specimens when the outer lid is set in place. The specimen box with inner lid in place, pull tab attached, and extra padding placed on top is shown below:

Cover the inner lid with padding to secure it firmly against the specimens.
- Seal closed specimen box with tape or rubber bands. The outer lid of the specimen box should be secured in place so that it does not “work” its way loose. Some people use tape, which is effective but must be cut if the box is opened for inspection, leaving the lid unsecured afterwards. I prefer to use sturdy rubber bands, which can be removed for inspection and then easily replaced afterwards. Some specimen boxes come equipped with metal tabs or hoops that fit through slots on the outer lid and that can be bent over to secure the lid in place. In my experience, these often break off after repeated use, so rubber bands or tape are a good insurance policy for such boxes. Another common practice is to wrap specimen boxes in packing paper or place them inside plastic, Zip-Lock bags. This was necessary in the days when excelsior shavings were often used as a packing material around the specimen box, which contained shavings that could work their way into the specimen box and cause damage. With the ready availability of modern packing materials such as foam peanuts there should no longer be any reason to use excelsior shavings. Still, wrapping or sealing inside a plastic bag can’t hurt if it is desired. A closed specimen box with rubber bands securely in place is shown in the photo below:
Specimen box sealed with rubber bands
- Place an address label on the specimen box. This will ensure that the shipment does not get tossed into the “dead mail” pile if the outer address label is lost or destroyed (I’ve left the label off in these examples to ensure privacy of the recipient).
- Secure multiple specimen boxes tightly together. If multiple specimen boxes are shipped together, they should be secured tightly together so that they cannot “bump” into each other during shipment. As mentioned before, tape works but might end up being cut for inspection, so I prefer to use large rubber bands. String can also be used to tie the boxes together, but unless the inspection agent is handy with knots the boxes may not get tied back together. The two specimen boxes included in the shipment I used for this example, secured tightly together, are shown below:
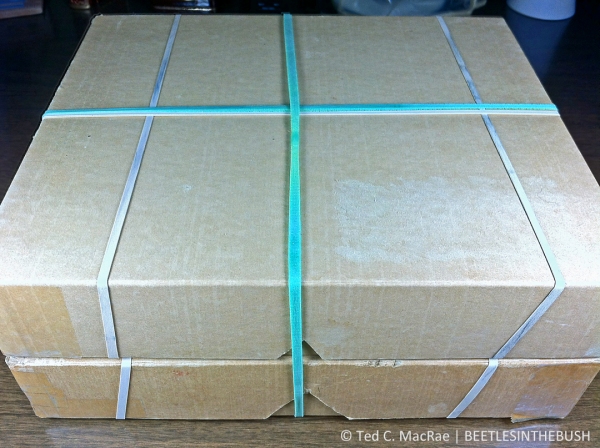
Multiple boxes should be bound tightly together.
- Pack specimen box inside an oversized shipping box. Shipping box size selection is critical! The shipping box should not only be sturdy but also big enough to accommodate specimen boxes with at least 3–4 inches below and 2–3 inches on top and each side of the specimen box. This space is necessary to allow the packing material to function not only as cushioning but also in “shock absorption.” My preferred packing material is foam peanuts, since it doesn’t settle during shipment and the amount used can be tailored precisely to the needs of an individual box. The photo below shows the pinning boxes resting on a 4-inch layer of foam peanuts with at least 2–3 inches of space on the sides and above:

Place specimen boxes inside a sturdy shipping box with plenty of room on all sides.
- DO NOT OVERPACK! This is the most common mistake people make! The packing material needs to serve two purposes: 1) provide a crush zone to protect from direct damage, and 2) provide shock absorption to protect from damage by impact jarring. The specimen box actually needs to be able to move slightly within the closed shipping box. If it cannot, energy from impacts is transmitted in full to the specimens inside, greatly increasing the risk that heavier body parts (especially the head/pronotum) will be jarred off the specimens. This not only results in damage to the broken specimen, but the dislodged body parts then act as “wrecking balls” that bounce and tumble inside the specimen box, destroying all of the specimens within their reach. After placing a 3–4-inch layer of packing in the bottom of the shipping box, I like to set the specimen box(es) on top of the foam in the center of the shipping box and fill the shipping box with additional foam peanuts to within about 1″ of the top. Avoid the temptation to fill the box to the brim, or to “settle” the foam peanuts and add a few more, as this will result in a tightly packed box that does not protect the specimens as well as a more loosely packed box. To test, close the flaps on top of the box and give the box a light up-and-down “shake”—you should feel the specimen box bounce slightly inside. If it does not, remove a small amount of packing peanuts and repeat the test. If you cannot remove enough packing peanuts without exposing the top of the specimen box inside, your shipping box is too small and you should select a larger size. The photo below shows the shipping box filled with packing peanuts to the proper level:

Shipping box ”almost” filled with packing material.
- Label the package “FRAGILE”. Whether this is actually helpful or invites abuse by some passive aggressive handler is a matter of debate, but I am of the opinion that a majority of shipping personnel will actually treat the package with a little more respect if they see this label, especially with the disclosure that the contents are preserved insects with no commercial but extreme scientific value. Additionally, disclosure of such information may actually be required by some destination countries, so it’s a good idea to label packages as a matter of routine practice. I like to place one label on top of the shipping box and additional labels on all four sides. BioQuip Products sells moisture-activated adhesive labels as shown below, or similar labels can be designed in a word processing program and printed on blank adhesive labels; however, the latter should be covered with clear tape to prevent them from peeling off of the shipping box during transit.

Place a fragile sticker on top and all four sides.
Much of what I have written here I learned as a graduate student, based on a much more detailed article by Sabrosky (1971) that provides additional suggestions for extremely rare and valuable specimens, advice regarding the different postal classes available for international shipments, and a list of “Don’ts” under any circumstances.
Disclaimer: I am an amateur—albeit a highly practiced one, and there may be additional suggestions or advice from professional collection managers and museum curators that would be highly welcomed in the comments below should it be offered.
REFERENCE:
Sabrosky, C. W. 1971. Packing and shipping pinned insects. Bulletin of the Entomological Society of America 17(1):6–8 [preview].
Copyright © Ted C. MacRae 2013

Your timing for this is impeccable. I’m heading to the post office with your box of buppies today; I’ll make some adjustments before I do 🙂
Glad we caught it in time! 🙂
*puppies
Make sure to punch a few holes so they can breathe during their voyage. 😉
Dang it, I KNEW I forgot something.
I do most of this, and add a well secured wad of cotton in one corner to “hook” any wrecking balls that come loose. I think the benefit of catching something at some point in the transit would help if something bad happened, and have only had one incident of parts coming loose (a very old Meloidae from Panama came apart, and happily got tangled up in the cottonwad before doing too much more damage).
I’ve done this on and off over the years but not consistently—I probably should make it a standard practice. It may be more important in a small box with a few, high value specimens.
Excellent piece, Ted. Just one minor suggestion for improvement: a photo of damaged specimens that were sent improperly would really drive home the importance of your technique.
I’ve only had one shipment that was heart-crushingly damaged—in this case by a dislodged head/pronotum from a very heavy-bodied specimen in a box that was far too small and tightly packed. It would have made a great example of what not to do had I thought to take a photo before I meticulously spent several hours repairing the specimens (at least, those that could be repaired).
An excellent tutorial. I would add a note about the extra bracing precautions needed for genitalia vials that are pinned beneath specimens. While I hate the practice (the pin goes through the stopper, so if the stopper comes loose the vial turns into a “wrecking ball” that even a cotton wad won’t stop), it sometimes can’t be avoided, and using pins to prevent such vials from getting loose can be tricky. It should also go without saying that if a shipment contains vials of insects, or microscope slides, they should NEVER be put inside the exact same box with pinned specimens, but a separate box within the main package.
Good point. I’ve never dealt with genitalia vials myself, since in the groups I study they can simply be exerted from the specimen and left in situ. Nevertheless, if it should go without saying not to include vials/slides in the same box as pinned specimens, then it still must be said!
I work with sciomyzid flies, many of which wind up with small, plastic genitalia vials pinned through the stopper, on the same pin as the specimen. When shipping such specimens, I cross two brace pins over the far end of the vial like an X and place another pin directly behind the far end of the vial to keep the vial from coming loose from the stopper. So far, so good. To view a box of specimens I recently received that lacked such brace pins, see http://www.trinidadbirding.com/temp/incorrect_pinning.jpg. Fortunately, no damage was done.
I’m not sure I’d have the courage to mail a box packed with such delicate specimens with all those vials!
Good stuff Ted. Another suggestion — although I hate to brace, missing something that can come loose or spin will cause irretrievable damage in many cases. My addition is to also brace long labels – especially older ones that may spin. You learn from mistakes and we’ve seen enough shipments come in with long labels wildly spun on pins knocking into parts of neighbor specimens; resulting in broken legs and other parts everywhere in the box.
Another good point. I’m used to dealing with relatively recently collected/curated specimens with small, tight-fitting labels. Many historical specimens aren’t quite so ready-to-ship. At any rate, if room allows it might be best to space adjacent specimens outside of their respective “zones of rotation.”
A fiine piece of educational writing and illustration. As a lepidopterist of nearly 60 years’ experience, I’d like to share 3 horror stories (though Hallowe’en was yesterday. The prevention remedies are obvious in each case.
1. A normally superb and careful colleagues sent me a loan for my PhD study of small moths. The moths were collected and prepared beautifully by him. He sent them in a Schmitt box. He did not notice several insect pins that had lodged around the periphery of the pinning bottom. In this case it was bullets, not wrecking balls!
2. After completing my PhD research I returned a large lot of moths and genitalia slides in a large carton to a major collection. The slides were in a large wooden slide box, wrapped, and put in with the insect boxes inside the large carton of padding. Apparently the curator had a volunteer unpack the shipment, and that person did not spot the slide box. I was asked later on when I was going to ship the slides! Apparently all were tossed.
3. In a more recent shipment of moths from another collection the specimens came in 3 Schmitt boxes, all packed in one carton. I did not get to them for a few months. When I did, the contents of one Schmitt box were almost all eaten by dermestids and booklice. I’m still trying to make up a replacement lot for those irreplacables.
Cheers, Charlie
Sad stories, indeed. Regarding #2, just today while unpacking an incoming shipment I almost tossed a specimen container because the package contained two containers that were not attached securely to each other. I pulled out the first container and did not know or expect to look for a second one. In addition to the chance of tossing a container, multiple unsecured packages inside the shipping container can bounce against each other during shipment and defeat the shock absorption around them.
#3 is a good reminder why shipments should be unpacked and inspected immediately upon arrival.
I shipped a lot last summer and all but one shipment were fine – all big beetles with bracing pins. But in one box a Dynastes did work itself loose and legs broke off ): The very nice recipient said he’d fix the damage, but I still want to send him replacements next season. While I’m now papering most of my fresh stuff, I’m still glad to learn about the inner lid. Great idea and it would have kept that big Dynastes in its place.
The key to the inner lid (in addition to fitting precisely) is to make sure there is firm support throughout the space between the inner and outer lids. If the support is just in the center a heavy specimen near one of the corners can still work its way loose.
Thanks. I needed this. Badly.
You’re welcome.
… very informative! For international shipments, additional to the BioQuip Fragile-label a proper & detail shipping documentation attached accessible to the outside of the parcel should be in place.
The statement “no commercial value” in many countries is insufficient to allow customs clearance; a “declared value for customs purposes” should be added, this value should not exceed 10,-U$ / EUR to avoid import turnover tax.
I believe all international shipments must have a separate customs declaration giving not only the value but also a more detailed description of the contents. In most cases it can be duplication of the information on the BioQuip label, along with number of specimens. I have had some European recipients tell me that a listed value of $10USD is less likely to be held up by customs than one with a listed value of $0USD. I recommend asking any international recipients to inform you of any special requirements for their particular country.
I can only agree on the “dislodged body parts then act as “wrecking balls” that bounce and tumble inside the specimen box” part. I recently shipped a box with some pinned praying mantises and other similar fragile species from SE Asia overseas. The parcel was turned upside down somewhere during the shipping process (Thanks, UP*), gravity kicked in, a large dung beetle got loose and “wrecking ball” is quite the right term for what happened next 😦
I probably should have addressed this in the post, but I also recommend labeling shipping boxes “This side up” and placing up arrows around the box on each side. This may not guarantee the box is never turned upside down, but like the “Fragile” labels it probably lowers the incidence.
Great tutorial, Ted!
In my experience, the US Postal Service is the least expensive yet still the most reliable courier for packages of insect specimens. They’re generally nicer to packages than UPS, FEDEX, etc.
I ship mostly via USPS but have used FedEx on occasion. I’ve not had a problem with either service, but the former certainly does have lower cost options.
Excellent information. I was taught how to properly pack specimens when I was an undergardauate in the late 1970s. Many of today’s graduate students have absolutely no idea. A few years back someone returned a box of specimens that were mostly trashed because the send had put in the equivalent of a wrecking ball in the box — a moth ball. ARGHHHH!
Ugh… Another point for the tutorial: never, ever, EVER put a moth ball in a shipped specimen box. There is no way to brace it securely enough!
Nice tutorial on shipping! On yet another note I should mention that type specimens need another level of care when packing. Each specimen should be put in its own box or unit tray then individually wrapped and sealed with cellophane or cling-wrap. If the box is stomped on or dropped down a flight of stairs at least each specimen is compartmentalized and the bits can be salvaged.
While I was in my undergrad I witnessed a fellow researcher open a box of type specimens shipped from Europe. A loose moth ball was left behind and utterly obliterated 15-20 primary types. A sad day!
Any museum that allows primary types to be packaged and shipped by somebody who needs to read this tutorial should be, well… no primary types for you!
Yes, primary types should be compartmentalized and returned by fully trackable, signature required services such as USPS registered mail. Moreover, many museums will not allow packages to be shipped during the holiday hulabaloo! If you can make arrangements for hand courier by traveling scientists that would be the best solution.
Pingback: How to Pack and Ship Pinned Insects – Entomology Today
Pingback: How to pack and ship pinned insect specimens | Lep Log
As an author I’m more of an etymologist than an entymologist, but I’m also passionately interested the life sciences, am a really rank but dogged amateur naturalist. I live in Florida (Bug World) and am constantly amazed at the new insects I discover everyday on my farm. What does it say about life and morphology (?) that there are so many varieties of insects on this planet? And why do they all look like space aliens a la the movies etc? 🙂 Love your blog
oops, entomology?
Glad you like it!
Thank you – I appreciate your readership.
Need any specimens? Every single insect on earth either calls FL home or winters here. U of FL does amazing research on bugs
Thanks Ted, just the information we were looking for!
Nice tutorial! I once had a box of specimens arrive that were mostly ruined because the sender thought it would be a good idea to place a napthalene ball among the specimens. It was sort of like the stone ball in the Indiana Jones movie. Nobody survived. Argh!
Napthalene balls are one of the worst things to put in an insect shipment for the very reason you describe! They’re not even really necessary, as it is unlikely the specimens will become infested during their short time in transit. That said, it’s a good idea to treat shipments when they arrive in case they were infested before they went out (I prefer a few days in the freezer).
Where do you get your specimen boxes for shipping?
You can purchase specimen mailers from BioQuip Products.
Thank you!
Pingback: Insect Identifications and Etiquette | Beetles In The Bush
Today I packed two boxes of pinned specimens, using the type boxes you pictured with the recommended space for peanuts to be sent to AZ from Virginia. With the new postal rate increases as of Sat. January 16, the Priority Mail charge came to 49.50.
If they went to a museum you could have sent them Library Rate for much cheaper. If they must go Priority, well it’s a small price to pay compared to risking damage to the specimens.
I just wanted you to know how helpful this post still is. I shared it with a graduate student working on fungi on insects so he can help pack boxes when he travels to other institutions. It has been immeasurably helpful to me as well since I normally ship things that are much less fragile!
If people have any vials with ethanol they should be aware they need to ship them in a separate package and follow either DOT (USA ground transport only!) or IATA shipping regulations. There is a steep fine for individuals as well as institutions if you are caught or anything happens!
For any shipments from/to the USA from other countries, people need to register the species and country of origin with an import/export permit from the US Fish & Wildlife Service. (Well, we do now in 2016).
Hi Genevieve – thanks for your nice feedback. Glad to know this has been helpful to so many people. I didn’t address vial specimens specifically, but yes you are right about the special shipping restrictions that apply. I did not know, however, about the required FWS import/export permit requirement for specimens shipped to/from the US. I’ll have to look into that.
sorry, can you tell to me how process of packing live insects (like rhynocoris fuscipes) to send?
Sorry, but I have no experience with packing and shipping livestock.
What do readers think of the comment that I’ve had from the UK state postal service who are refusing to pay out for damage on a fully-insured package because “there was nothing in the inner box apart from the specimen itself” and that I should have ensured that “containers are filled out with cushioning material like bubble wrap or polystyrene chips”? In other words, incredible as it seems, they’re refusing to honour a service commitment because the inner box with the specimen wasn’t packed with materiel that would inevitably damage the specimen! Can anyone conceive that any entomological specimen would survive packing? My specimen was not dislodged in the post, the pin was still in situ, but its body parts became detached due to the shock of an apparent violent blow in the post, evidenced by sharp impact damage to the box. .
Obviously the article above does not deal with this as no-one in their right mind (the Royal Mail obviously is not) would do such a thing.
Views appreciated.